Planning a wedding is one of the most exciting moments in life. From choosing outfits to finalizing venues, every detail matters. One of the first things your guests will see is your save the date card.
That is why learning how to customize save the date cards properly is very important.
When you customize save the date cards in the right way, you create a strong first impression and make your wedding announcement memorable.

In this guide, I will explain everything in simple language so that even beginners can easily customize save the date cards without stress.
💥 Affiliate Disclosure
This post contains affiliate links. If you click on these links and make a purchase, I may earn a small commission at no extra cost to you. This helps support Dirty Fever and allows me to continue creating helpful wedding content.
Why You Should Customize Save The Date Cards
Many couples simply select a template and place an order. But when you customize save the date cards yourself, you get full creative control.
Here are some major benefits:
- Your card becomes unique
- You can add personal photos
- You can include QR codes
- You can match your wedding theme
- You can improve print quality
- You can impress your guests
When you customize save the date cards, you are not just designing a card. You are creating a memory.
👉 Looking for professionally designed templates?
Check out our premium collections:
- Top Zazzle Save The Date Cards by Dirty Fever
- Best photo save the date cards
- Luxury save the date cards
- Affordable save the date cards
Getting Started Before You Customize Save The Date Cards
Before you start, make sure you have these things ready:
- High-quality couple photos
- Wedding date and location
- Website or RSVP link
- Color theme idea
- Font preference
Zazzle editor works online, so you don’t need any special software.
Once you click “Customize,” you are ready to customize save the date cards easily.
How to Customize Save The Date Cards Step-by-Step Guide
Now let’s go through the complete process of how to customize save the date cards using seven important elements.
1. How to Add Photos
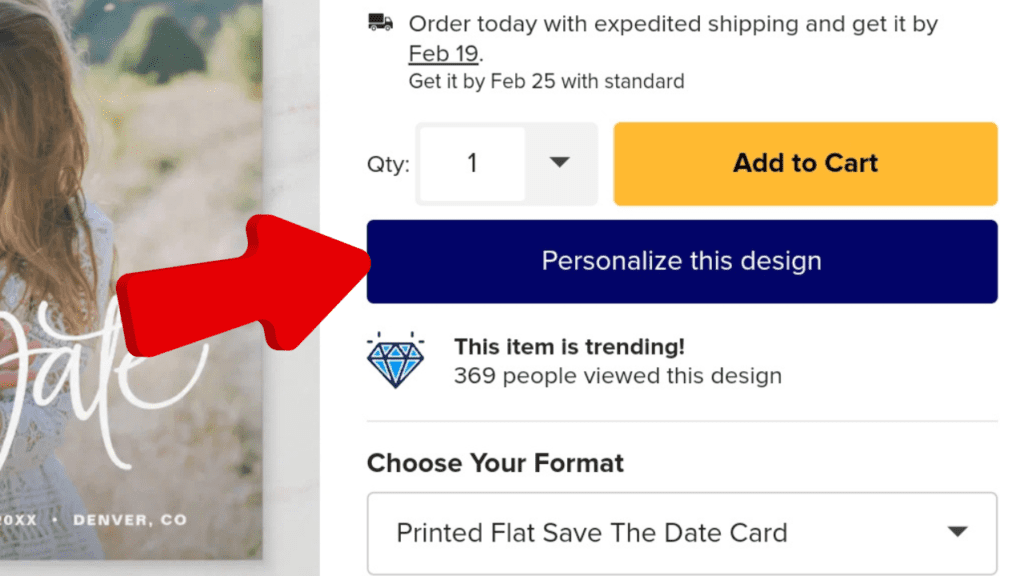
Photos make your card emotional and personal.
To add photos:
- Click on “personalize this design”
- Upload your image
- Drag it into the photo area
- Resize properly
- Adjust brightness if needed
Always use clear and bright images. When you customize save the date cards with high-quality photos, the final print looks premium.
2. How to Add QR Code or Barcode
QR codes make your card smart and modern.
You can use them for:
- Wedding website
- Google Maps
- RSVP form
- Gift registry
Steps:
- Generate QR code online
- Download image
- Upload to editor
- Place it neatly
- Test before ordering
When you customize save the date cards with QR codes, guests can easily access information.
3. How to Change Colors
Colors decide the mood of your wedding card.
Popular themes include:
- Gold & Black – Luxury
- Blush & White – Romantic
- Green & Cream – Nature
- Silver & Grey – Minimal
Click on background or text to change colors.
Always keep contrast high so text is readable when you customize save the date cards.
4. How to Customize Fonts
Fonts affect readability and style.
Good font choices:
- Script fonts for romance
- Serif fonts for tradition
- Sans-serif for modern look
Tips 🌟
- Use only 2–3 fonts
- Keep names bigger
- Avoid hard-to-read fonts
When you customize save the date cards with clean fonts, your design looks professional.
5. How to Adjust Layout
Layout means how elements are arranged.
Common layouts:
- Centered
- Split
- Vertical
- Horizontal
Use drag-and-drop tools to balance elements.
A clean layout helps you customize save the date cards in a visually pleasing way.
6. How to Edit Text
Text is the most important part of your card.
Include:
Couple names
Wedding date
Location
Short message
Example:
Save the Date
Emma & John
June 15, 2026
New York, USA
Double-check spelling before finalizing. Mistakes can ruin your effort to customize save the date cards.
7. How to Add Links
Links give guests easy access to more information.
You can add:
- Wedding website
- RSVP form
- Location link
Usually, links are added through QR codes or small text.
Always test links after you customize save the date cards.
Common Mistakes to Avoid While Customizing
Many couples make these mistakes:
❌ Using low-quality photos
❌ Adding too many fonts
❌ Poor color contrast
❌ Very small text
❌ Untested QR codes
❌ Overcrowded design
Avoiding these mistakes will help you customize Zazzle save the date cards successfully.
Best Tips to Customize Save The Date Cards Like a Pro
Follow these expert tips:
✔️ Order a sample first
✔️ Preview on mobile and desktop
✔️ Keep design simple
✔️ Match wedding theme
✔️ Review details twice
✔️ Save backup copy
These tips make it easier to customize save the date cards with confidence.
Before Customizing your wedding stationery, explore our ultimate guide to save the date cards for design ideas, wording tips, and modern trends.
For pricing and delivery details,
👉 Save The Date Cards Pricing, Shipping & Delivery Guide
👉 How to order Save The Date Cards ( Full Guide )
👉 Best Save The Date Cards Design ( Top 10 Design’s )
About Dirty Fever – The Creator
Hi, I’m the creator of Dirty Fever.
I design elegant and easy-to-customize wedding stationery for couples who want stylish and affordable designs.
Every product is tested for quality and customization before publishing.
Frequently Asked Questions (FAQs)
Q1 / Can beginners customize save the date cards?
Yes, the editor is very beginner-friendly.
Q2 / Can I edit after ordering?
No, always review before placing an order.
Q3 / How long does customization take?
Usually 20–30 minutes.
Q4 / Are QR codes safe for printing?
Yes, if high-resolution images are used.
Final Thoughts
Learning how to customize Zazzle save the date cards gives you full control over your wedding announcement.
With photos, QR codes, colors, fonts, layouts, text, and links, you can design beautiful cards without hiring a designer.
Now that you know how to customize Zazzle save the date cards properly, you can confidently create your perfect wedding announcement.
Start customizing today and make your special day unforgettable.
Written by ❤️ Magan Soni ( creator on Zazzle )